DIY the bat cape
Halloween is coming… It's time to make your costume! I suggest you make this "bat" cape in a few minutes. For sure, this Batman costume will appeal to young and old ;-) A super easy tutorial: only one seam is necessary and can even be done without a sewing machine. You just need to wear black clothes underneath to achieve a perfectly scary look. Boooooh !

MATERIAL :
To make you Halloween costume :
- A plain black fabric
For more ease, I recommend a fluid and extensible material. I chose a black jersey fabric.
- A few pins (optional)
- Black sewing thread
- The pattern
Step 1 : The measurement of your cape
- For the width, raise your arms stretched to shoulder height and measure the distance from wrist to wrist.
- For the height, stand and take the measurement between the neck and the hollow of the knee then add 15cm.
Then cut your panel.
Step 2 : Cutting out
Fold your panel in two to have the half of the width then fold the upper part over about 15cm (which will be used to make the sleeves).


Then cut the collar as shown below. Small tip: use one of your existing clothes as a guide. Also cut the flap to allow the entry of the arms into the cape.
.png)
On the opposite corner, draw then cut out a series of rounds as shown on the pattern to obtain bat wings.

Step 3 : Seam of the armholes
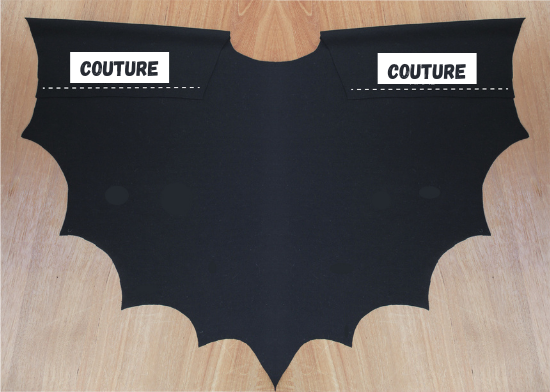
This is what you get once you unfold your fabric.

We finish with the armholes: fold the flaps on each side, pin if necessary and sew a seam according to the dotted lines. If you are using the sewing machine choose a zig-zag stitch to allow the fabric to stretch.

Put on your cape and go trick-or-treating!

See you soon, Léa


habaruannie@hotmail.com - 02/19/2022 09:10:34
Super. Merci pour vos réalisations. Mon p'tit Léon est encore trop petit, je garde tout pour plus tard